Vitrification
We develop the solutions that are necessary in the vitrification of mammalian embryos of any species, as well as in cryopreservation of oocytes and sperm of mammals.
In ECMPC we work with the most effective worldwide formula, counting with endorsed certificates with more than 15 years of experience supporting our services, That is why we are committed to each of our clients in providing not only effectiveness, but quality and commitment.

Materials
- Vitrification Method
-Equilibration Solution (ES) : 1 vial (1.0mℓ)
-Vitrification Solution (VS) : 2 vials (1.0mℓ) - Microscope
- Timer
- Tweezers
- Scissors
- Micropipette (300μℓ)
- Pasteur pipette (150μm inner diameter)
Preparation
Keep ES and VS vials at room temperature (25℃ to 27℃) for at least 2 hours before vitrification.
Equilibration (12-15-min)
1.- Using the micropipette, fill the Vitri Plate wells with 300μℓ ES and 300μℓ VS respectively (fig. 1). Immediately place the lid on the Vitri Plate.
2.- Observe the oocyte/embryo closely and memorize the size and shape of the perivitelline space in it. This will be used to indicate the full recovery of the oocyte/embryo during the equilibration process.
3.- Aspirate the oocyte/embryo using the tip of the Pasteur pipette.
4.- Place the oocyte/embryo along with a small amount of medium on the surface of the ES (fig. 2).
5.- Activate the timer to begin counting.
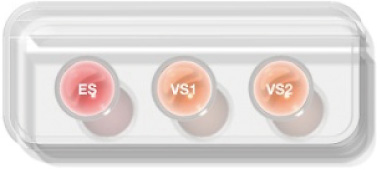
Fig. 1. Solution Preparation
6.- If the oocyte/embryo is healthy, it should shrink within the first 30 seconds or so. If it does not, there may be a problem with it; note this for your own future reference.
7.- Once you’ve noted the shrinking of the oocyte/embryo, recall the original perivitelline space and wait for it to fully recover. This recovery process generally takes 6-15 minutes.
8.- While waiting for recovery to take place, use your scissors to open the Vitrification method packaging; make sure your cut is perfectly round to ensure smooth removal. Write the ID information of the oocyte/embryo on the Vitrification method “handle” and place it in the groove found on the Vitri Plate (fig. 3). Make sure the logo is facing up and away from you.
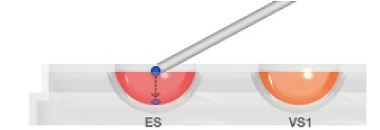
Fig. 2. ES Equilibration
9.- While waiting for recovery to take place, use your scissors to open the Vitrification method packaging; make sure your cut is perfectly round to ensure smooth removal. Write the ID information of the oocyte/embryo on the Vitrification method “handle” and place it in the groove found on the Vitri Plate (fig. 3). Make sure the logo is facing up and away from you.
10.- When the oocyte/embryo’s volume has fully recovered, ES equilibration is complete.
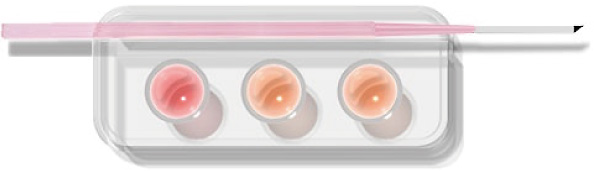
Fig. 3. Vitrification method on Vitri Plate
If you’re unsure if it has fully recovered, the time limit for the equilibration process is 15 minutes for oocytes and blastocysts (160-220μm in diameter) and 12 minutes for 4- or 8-cell embryos. Any longer exposure to the ES may be toxic to the oocyte/embryo.
Vitrification 1 (30 - 40 sec)
1.- Aspirate the oocyte/embryo with a small amount of ES using the tip of the pipette.
2.- Place the oocyte/embryo midway down on the left side of the VS1 well.
3.- Remove the pipette from the well and expel the remaining ES (step 2-1), aspirate VS1 near the right edge of the well (step 2-2), and immediately expel it in the same manner as before (step 2-3)
4.- The oocyte/embryo will then float to the surface of VS1 (step 2-4). After aspirating fresh VS from the edge of the well, use the tip of the pipette to aspirate the oocyte/embryo.

Step 1
Step 2
5.- Place the oocyte/embryo at the bottom of VS1 (step 3).
6.- The oocyte/embryo will float to the middle and stop there (end of VS1 equilibration, step 4).
7.- Expel any VS1 left in the pipette, then aspirate and expel fresh VS2.
8.- Aspirate VS2 and then the oocyte/embryo in VS1 using the tip of the pipette.

Step 3

Step 4
Vitrification 2 (10 - 20 sec)
1.- Place the oocyte/embryo midway down on the left side of the VS1 well (step 5).
2.- Rinse out the pipette using fresh VS2 (step 6-1 2 3)
3.- Aspirate fresh VS2 from the right edge of the well, stir the solution around the oocyte/embryo, and observe the full shrinkage of the oocyte/embryo (step 7).
CAUTION: Make sure there is absolutely NO ES left inside the pipette or the oocyte/embryo: Any remaining ES may cause the formation of ice crystals in the liquid nitrogen
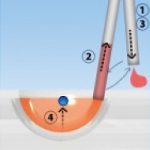
4.- Place the oocyte/embryo in the tip of the pipette (step 8).

Step 5

Step 6
5.- Tap the pipette on the Vitrification method strip to place small droplets of VS2 until you see the oocyte/embryo come out. The proportion of the diameter of the droplet compared to the oocyte/embryo should be about 2:1.
CAUTION: Please note that a droplet which is too big or too small could cause the formation of ice crystals or mechanical damage. Do not attempt to adjust the size of the droplet after placing it. Disrupting the surface tension can cause serious damage to the cytoskeleton of the oocyte/embryo.
6.- Place the Vitrification method in the liquid nitrogen and stir it gently.
7.- Place the Vitrification method cap in the liquid nitrogen.

Step 7

Step 8
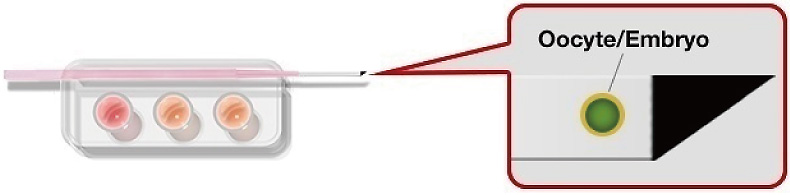
Fig. 6. Oocyte/Embryo on the Vitrification method
Note 1
Use the Pasteur pipette of the optimum size.
- 140-150μm inner diameter for oocyte and cleavage stage embryo.
- 160-220μm inner diameter for blastocyst (depending on the size of the blastocysts).
CAUTION: If you are going to vitrify a blastocyst with a diameter of 220μm or greater, always conduct a pre-shrink process
Note 2
Best timing for the vitrification of blastocyst: The diameter should be between 160-220μm to ensure a 100% survival rate.